Migrate Microsoft Lists to Dataverse for Teams
Despite this blog post’s catchy title there is no magic upgrade button to move Microsoft Lists to Dataverse for Teams. There may be in the future but until then migration translates to rebuild. A list rebuild to Dataverse will most likely be caused by a design requirement that Lists is not suited to, like setting up complex table relationships or custom security configurations in the data. In this post I am redesigning my list to have a more normalized structure. I am using a customized version of the Microsoft Lists Issue Tracker template in this demo and will split the list into multiple tables. The Issue Tacker list structure lends itself to capturing process transactions. The Issue Source column stores the related apps and services that might have issues that need tracking. Moving Issue Source to a related table allows us to add more metadata about the source like person responsible, standardizes data entry and makes for a better user experience by moving away from manual data entry to a lookup experience. In a relational design view Issue Source will have a 1-to-many relationship to the Issue Tracker table.
To get started with our list migration connect to Microsoft Teams, click More added apps and then select Power Apps.
Click Start now on the How to create an app for your team screen.

Select your target team and then click Create.

Power Apps will create the Dataverse for Teams database and send you an email when complete. After the provisioning is complete you are prompted to supply an app name in the Power Apps Teams maker experience. Enter an app name and click Save.

We will create our new tables, Source and Issue Tracker , by clicking on With data on the Start this screen form.

Our Source table has a 1-to-many relationship with the Issue Tracker table, this means we should build Source first. Enter a table name and click Create. Notice that Dataverse tables names are usually named in singular form and then given a plural name within the create table experience.

We can add columns to our table by clicking the Add column button. I like to add an “ID” column to all of my tables using the Auto number column type with a string prefix. If the Name value changes in the table, I can supply data continuity through the ID column. To create the column, click Add column and set:
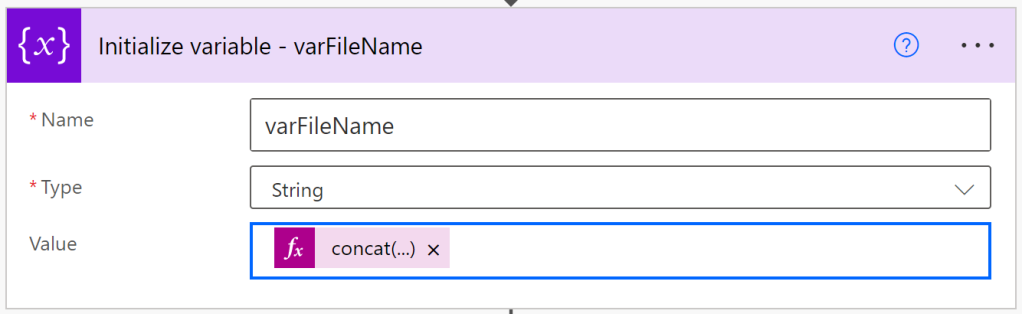
- Name to “Source ID”
- Type to “Auto number”
- Autonumber type to “String prefixed number”
- Prefix to “SRC”, this can be any value but should reflect the table name in some form
- Minimum number of digits to “4”, this value should reflect the max number of entries you expect in this table
- Seed value to “1000”, this can be any value and in is usually influenced by a business requirement
- Max length to “100”, this value should reflect the max number of entries you expect in this table
- Click Create
The Source table will include a service owner column. Unlike Microsoft Lists there is no Person column, and we will use the Email column instead. Click Close when complete to save the table changes and return back to Power Apps.

Our next step is to create the Issue Tracker table.

Add the following columns shown below:
| Column name | Column type |
| Issue ID | Auto number with: – Autonumber type set to “String prefixed number” – Prefix set to “ISS” – Minimum number of digits to “4” – Seed vale set to 1,000 – Max length to 100 |
| Folder Location | URL with max length 255 |
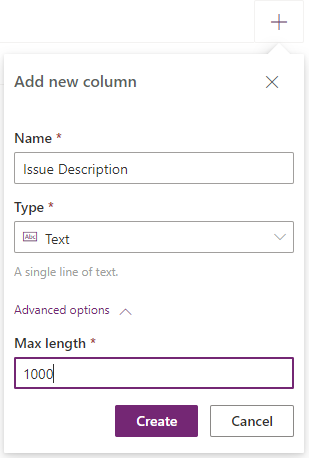
| Issue Description | Text with max length 1,000 |
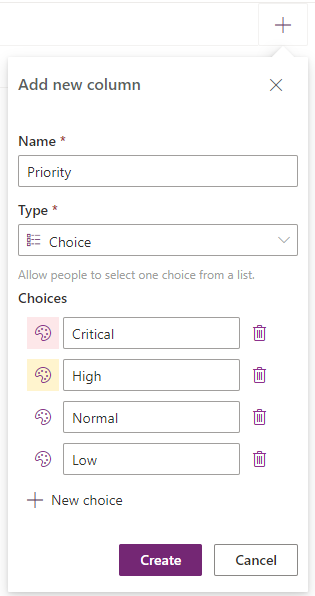
| Priority | Choice with the following choices: Critical, High, Normal, Low |
| Status | Choice with the following choices: Blocked, In progress, Completed, Duplicate, By design, Won’t fix, New |
| Assigned To | Email with max length 100 |
| Date Reported | Date with default options |
| Due Date | Date with default options |
| Days Old | Number with default options |
| Issue Source | Lookup with related table set to Source |
Column creation images are shown below.
Click Close when complete to save the table changes and return back to Power Apps.
Back in Power Apps, click With data in the Start this screen and select “Issues” to build our starter app.

Our starter app looks good but requires a few modifications to make it work for our design.

Click EditForm1 and then click Fields.

We will add the Issue Source column to our form by clicking Issue Source and then click Add. Use the Columns and Layout controls to layout the form in your preferred way.

With very little modification our starter app is simple, clean and looking good.

We need to publish the app to Teams for general use. Click Publish to Teams and update the Name, Icon and fill colors as desired.

Our finished app looks like the image below.

Microsoft Lists are great, and I use them every day in my professional life. When requirements exceed what Lists are capable of then migrating to Dataverse for Teams is a smart choice. You don’t have to be a developer to take advantage of what is possible with the out-of-the-box Dataverse for Teams functionality. In future posts we will extend the functionality of our app with Power Automate and Power Apps.
Thanks for reading!
NY
Update: Soon after posting this article, Scott McKenzie let me know that: “Dataflows for Dataverse Teams is now available in preview. If you create a new Dataflow utilizing your existing SharePoint List, you have the ability to create the Entity with matching Fields and transfer the data rather than having to build the Entity and Fields from scratch.” If I were doing straightforward List to Dataverse for Teams migrations I would definitely look into Dataflows.
image-33

nyoung30

Add Power Apps to Microsoft Teams
How to create an app for your team screen
Select your target team and then click Create.
Enter an app name and Save.
Start this screen With Data
Create a table experience
Source ID column definition

Populated Source ID column.

Owner column using the email column type.
Issue ID column using Autonumber`

Folder Location column using URL column type

Issue Description column using the Text column type
Priority column using the Choice column type
Date Reported column using the date column type

Issue Source column using the Lookup related table column type

Start this screen with data
Power Apps starter app
Editing the form in our starter app
Add Issue Source column
Updated starter app
App publishing experience in Teams
Our final app rendered in Team and looking good!