Microsoft a annoncé avoir procédé à des « améliorations de la sécurité des périphériques Windows qui analysent WSUS » lors du patch Tuesday de septembre. Seulement ces améliorations pourraient empêcher les postes sous Windows 10 d’obtenir la prochaine cumulative Update. Avec la mise à jour cumulative de septembre 2020 de Windows 10, l’éditeur a introduit des modifications […]
Microsoft vient de passer la version 1906 de ConfigMgr (5.00.8853.1000) en disponibilité générale. Cette version devrait apparaître pour tous dans les consoles à la condition de disposer au minimum de la version 1806. Pour connaitre les nombreuses nouveautés : https://docs.microsoft.com/en-us/sccm/core/plan-design/changes/whats-new-in-version-1906
Microsoft a libéré cette nuit un nouveau correctif pour la version 1902 de ConfigMgr. Celui-ci est disponible dans la console pour les Fast Ring comme pour les autres et corrige énormément de problèmes comme dans l’OSD ou dans les communications https. Problèmes résolus : Le téléchargement de package de la tâche séquence action échoue et le […]
Voici la troisième et dernière vidéo de la nouvelle série de tutoriels vidéo sur Peer cache dans SCCM CB enregistrée par Microsoft. Cette série est animée par @Steve Rachui , un des principaux ingénieurs de terrain de Microsoft. Cette troisième vidéo se concentre sur l’intégration de BranchCache à Configuration Manager. La discussion inclut des détails sur la manière […]
Voici la deuxième vidéo de la nouvelle série de tutoriels vidéo sur Peer cache dans SCCM CB enregistrée par Microsoft. Cette série est animée par @Steve Rachui , un des principaux ingénieurs de terrain de Microsoft. Cette deuxième vidéo se concentre sur les fonctionnalités de Peer cache intégrées à Configuration Manager et détaille spécifiquement le fonctionnement de la […]
Edit 01/06/2022 : updating this article to include Azure Virtual Desktop Windows 10 / Windows 11 multi-session enrollment command using Device Credential
——–
There are several ways to enroll a Windows 10 PC to Microsoft Intune:
Manually
During the Out-of-the-box Experience (OOBE), when starting a Windows 10 PC for the first time
In the Windows Settings, after the PC configuration
Manual enrollment will require that the user enters his Azure AD credentials.
Automatically
Using Azure AD Join + automatic Intune enrollment
Using Hybrid Azure AD Join + automatic Intune enrollment
Automatic enrollment can be triggered using a Group Policy, SCCM Co-Management or Windows AutoPilot.
Windows 10 automatic enrollment requires the creation of public DNS records enterpriseregistration and enterpriseenrollment. More info here.
However, sometimes it is possible that a Windows 10 PC is in an inconsistent enrollment state, with error “The sync could not be initiated“.
This can happen because:
The PC was shut down during a long time, and the Microsoft Intune certificate is expired (located in Local Machine / Certificates / Personal)
Someone manually deleted the Microsoft Intune certificate
The PC is enrolled in another Intune tenant
Prerequisites: check Hybrid Azure AD Join status
Before re-enrolling your device to Microsoft Intune, you need to make sure that the certificates for Hybrid Azure AD Join are not expired as well.
The easiest way to unenroll a Windows 10 PC from Microsoft Intune is to disconnect the work or school account.
Just go to All settings > Accounts > Access work or school, select your corporate account and click Disconnect.
Important: this menu is not available on Windows 10 / Windows 11 multi-session edition for Azure Virtual Desktop.
However, the problem with this is that all data and configuration pushed by Microsoft Intune will be deleted from the PC.
Method 2: Without data or configuration loss
There is a way to manually re-enroll your Windows 10 PC without loosing all the current configuration and apps deployed by Microsoft Intune.
This method is not officially supported by Microsoft
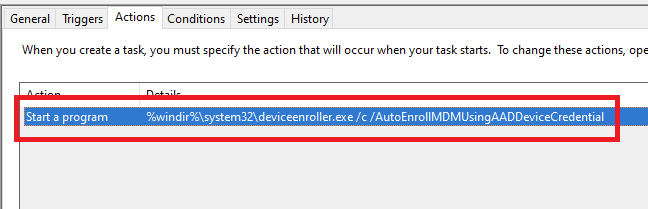
As you may know, automatic enrollment can be triggered either by a Group Policy Object or by the SCCM client on a co-managed device.
In both cases, the feature will basically create a scheduled task to enroll the PC at next logon. The command is different if you are trying to enroll Windows 10 / Windows 11 Enterprise multi-session devices from Azure Virtual Desktop (using Device Credential) or a regular Windows 10 / Windows 11 device using User Credential:
Windows 10 / Windows 11 Enterprise (with User Credential)
DO NOT delete registry keys that are not in the list above. They will be overwritten after the new enrollment.
Step 3: delete the Intune enrollment certificate
Follow the procedure:
Search for the option “Manage computer certificates” or use the command certlm.msc as an administrator.
Go to Personal > Certificates and delete the certificate issued by either “Microsoft Intune MDM Device CA” or “SC_Online_Issuing” (depending on the date of the enrollment).
Step 4: Restart the enrollment process
To be properly executed, the enrollment command must be entered in a SYSTEM context. We will use the PSExec tool for that purpose.